This blog post demonstrates how to use the State Management building block of Dapr and .NET Aspire to build distributed applications. Applications can leverage the state management API to save, read, and query key-value pairs, enabling the development of stateful, long-running applications. Dapr State Management building block abstracts the underlying data stores, enabling seamless switching between different state store providers without code changes.
For a complete list of currently supported state stores, refer to the State Stores documentation.
This post builds upon my earlier article, Dapr & .NET Aspire. Before proceeding, ensure that you have completed all the steps outlined in that article, except for the section beginning with Preparation of Local Docker Container Registry. Since our focus is on state management, we will not perform deployment.
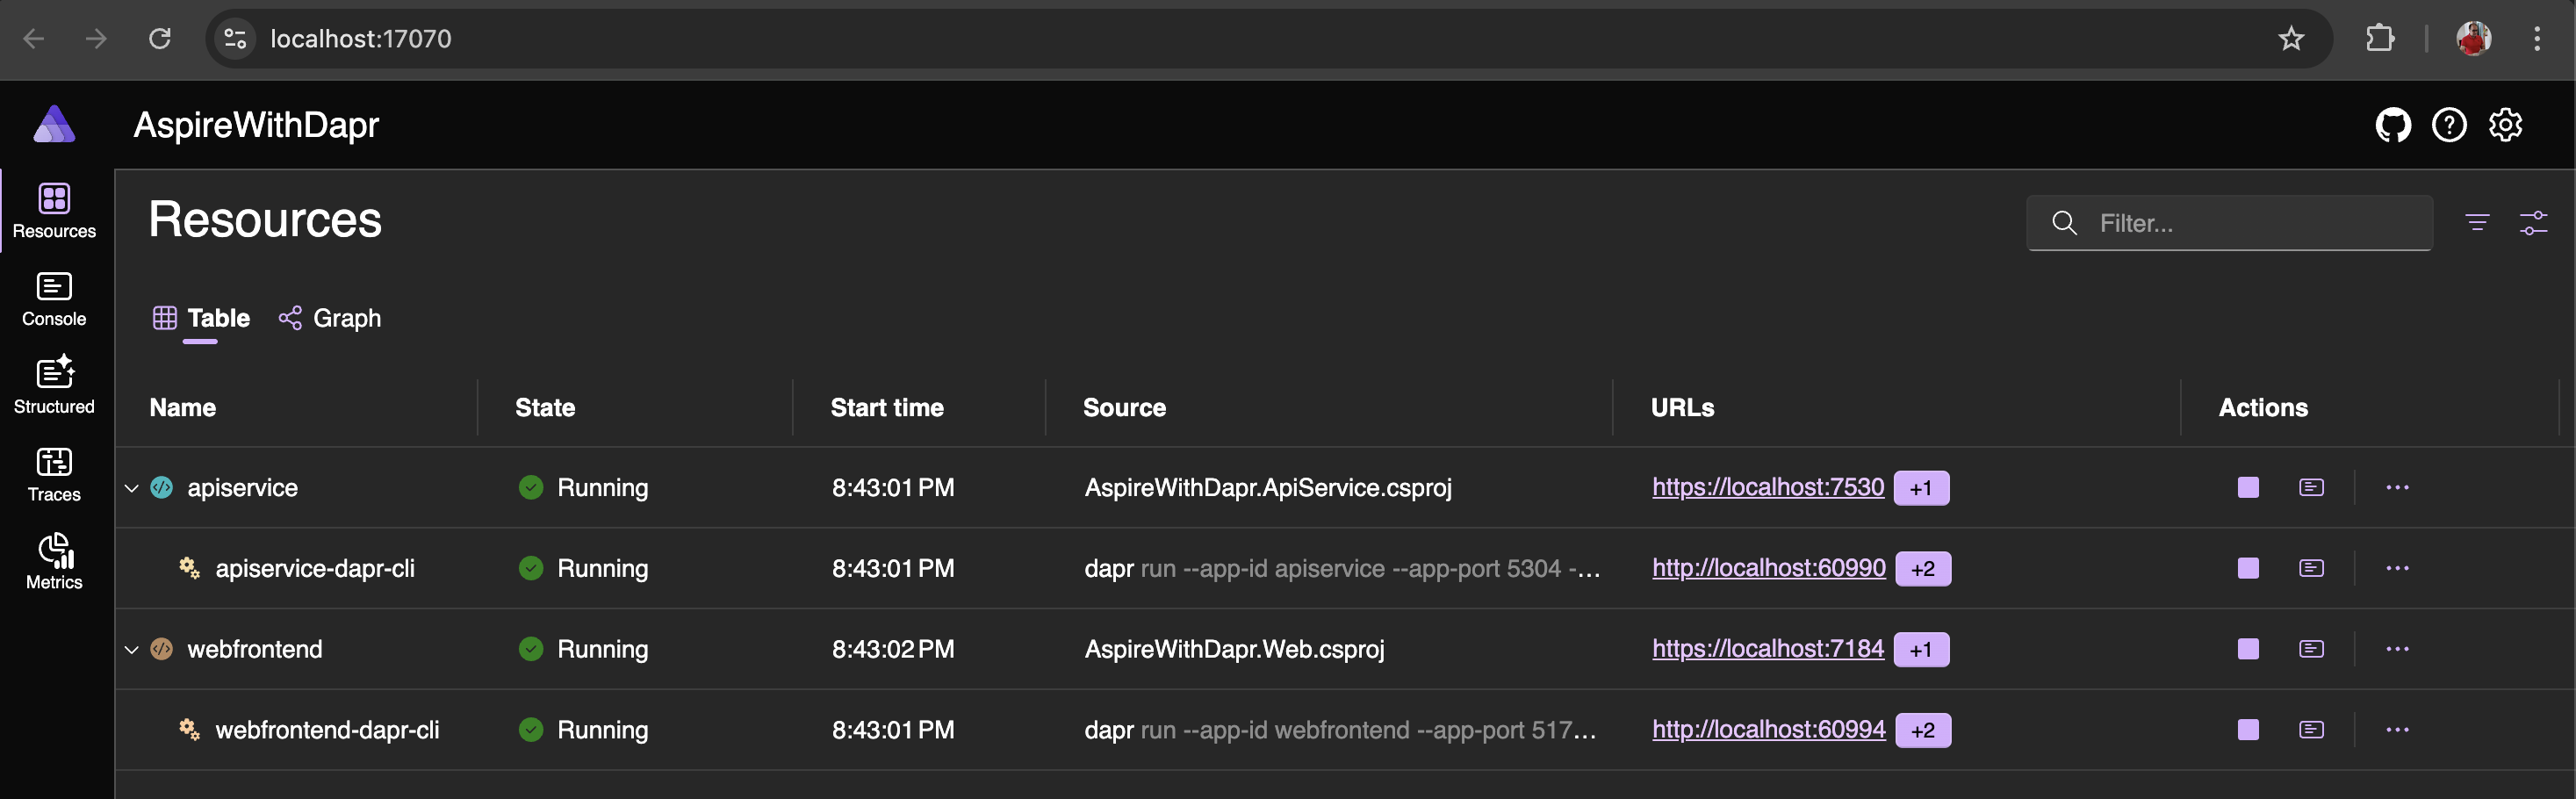
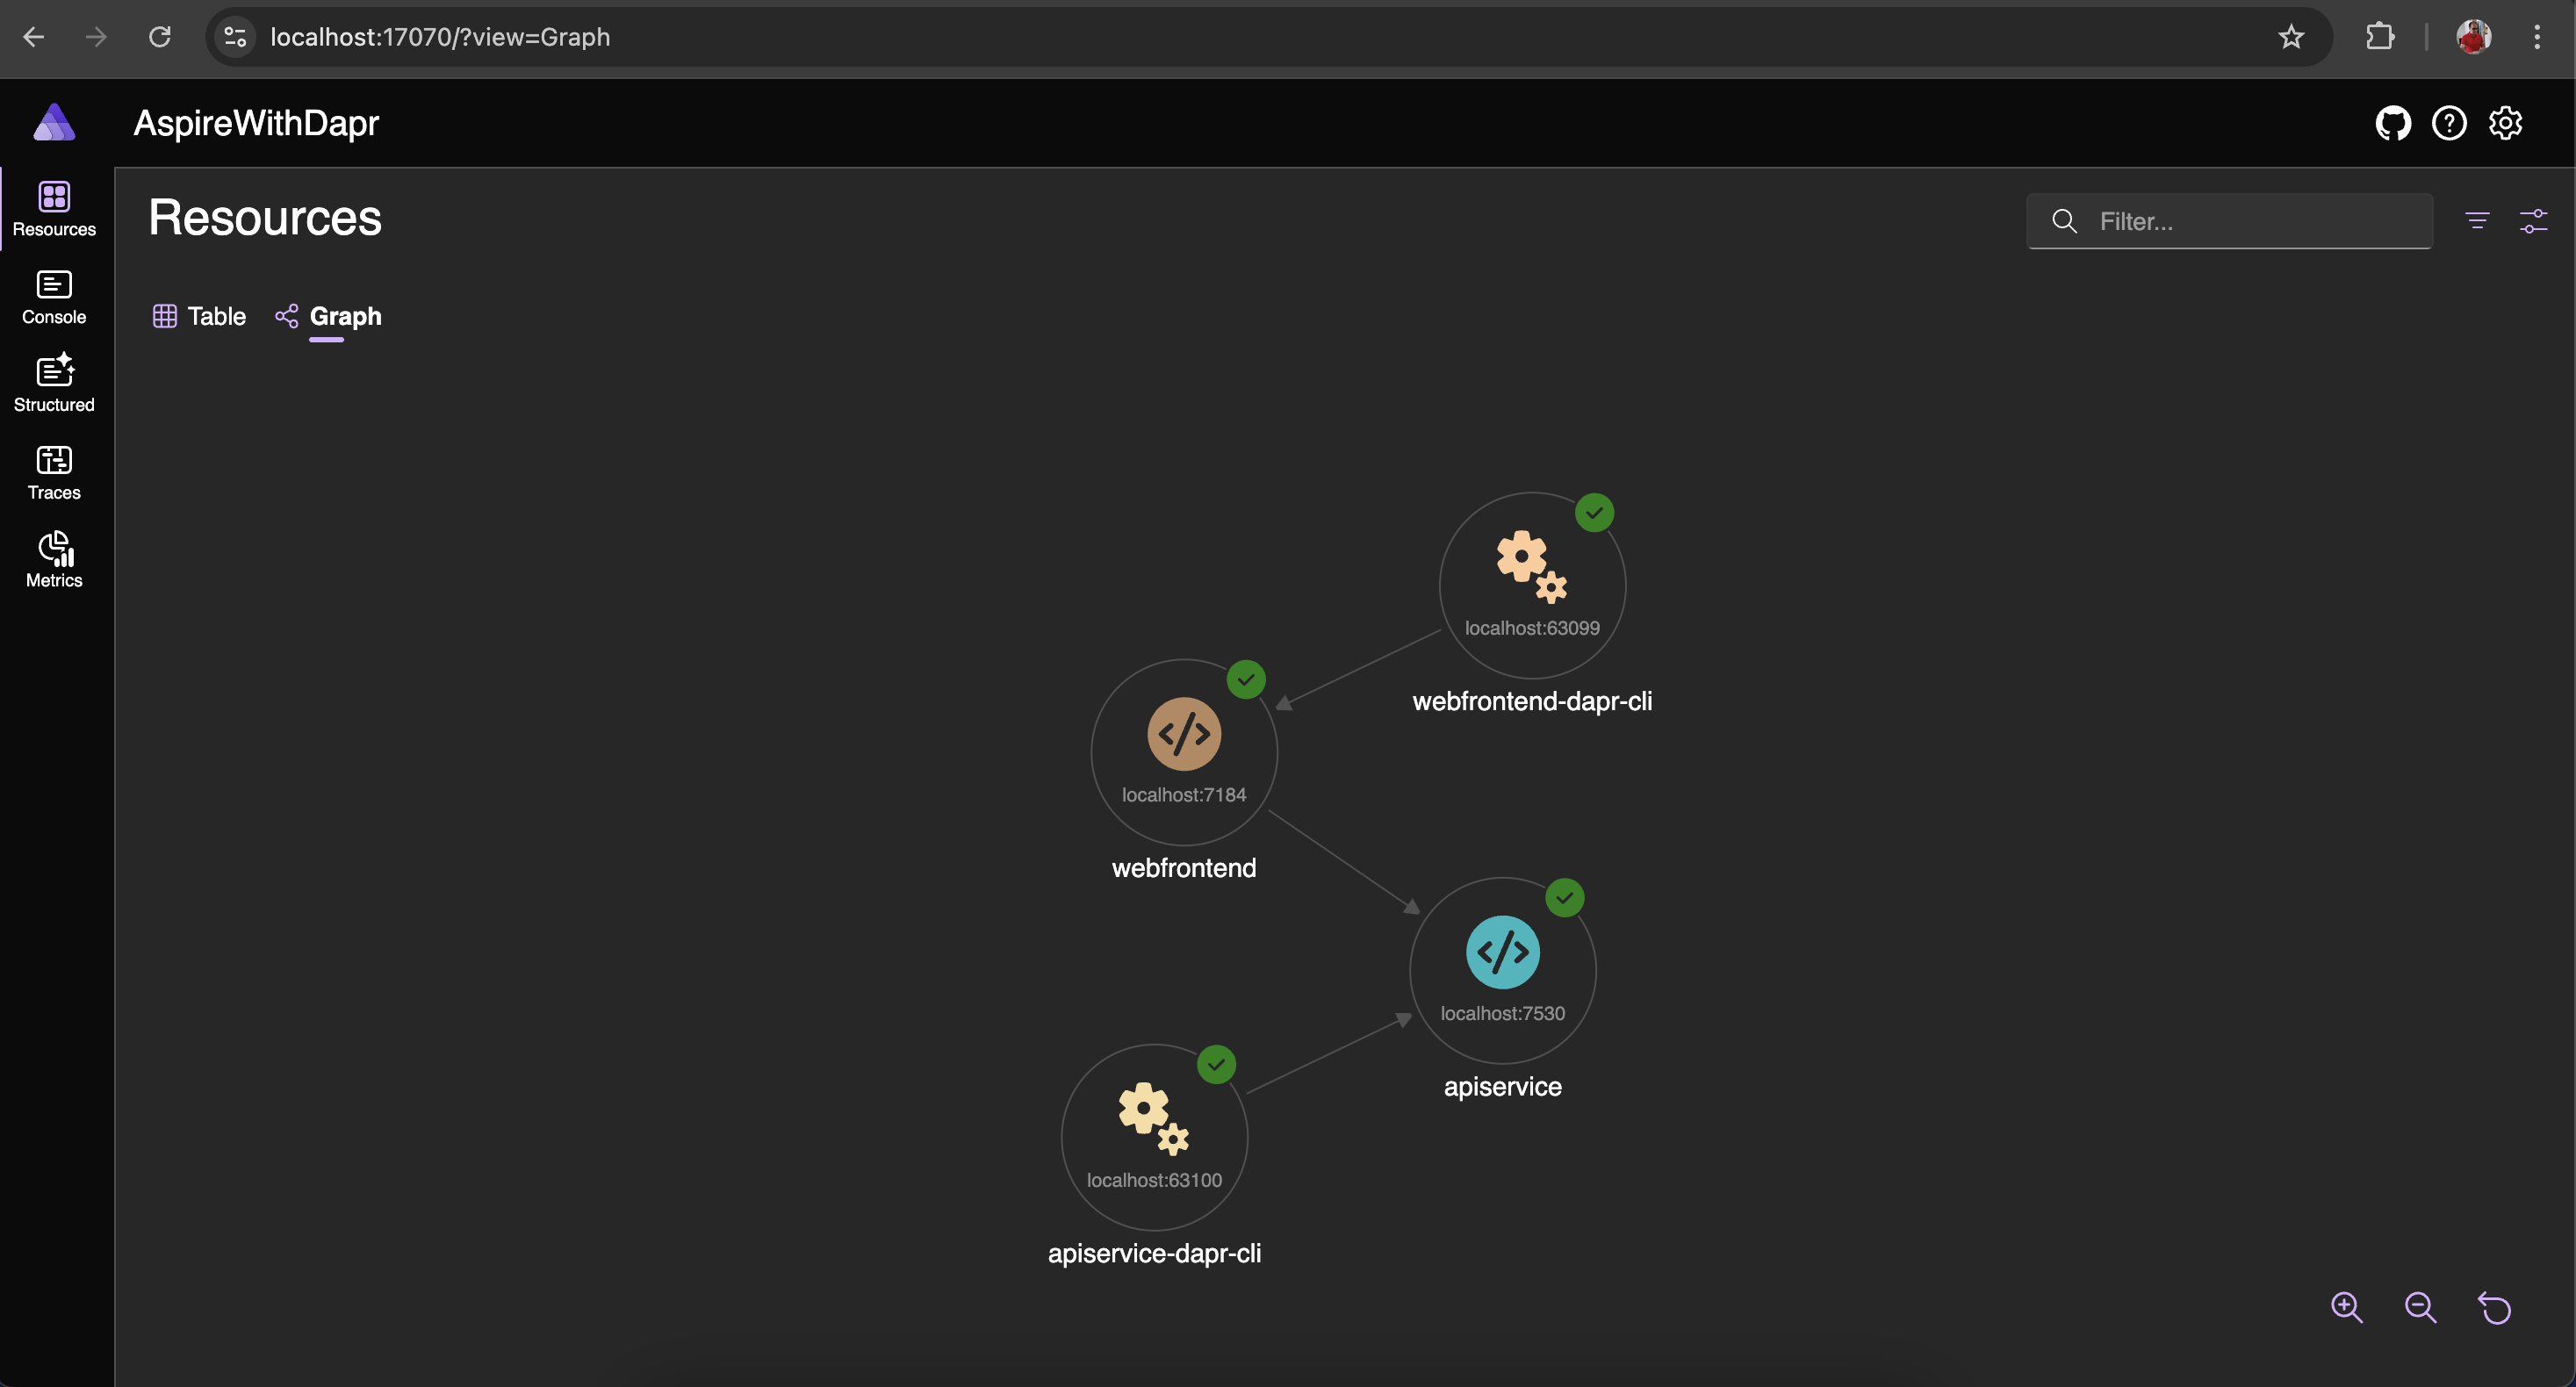
Upon successful completion, you can access the Aspire Dashboard by clicking the URL in the host section of the terminal window. You will see two additional resources listed: apiservice-dapr-cli and webfrontend-dapr-cli, which correspond to the Dapr sidecars.
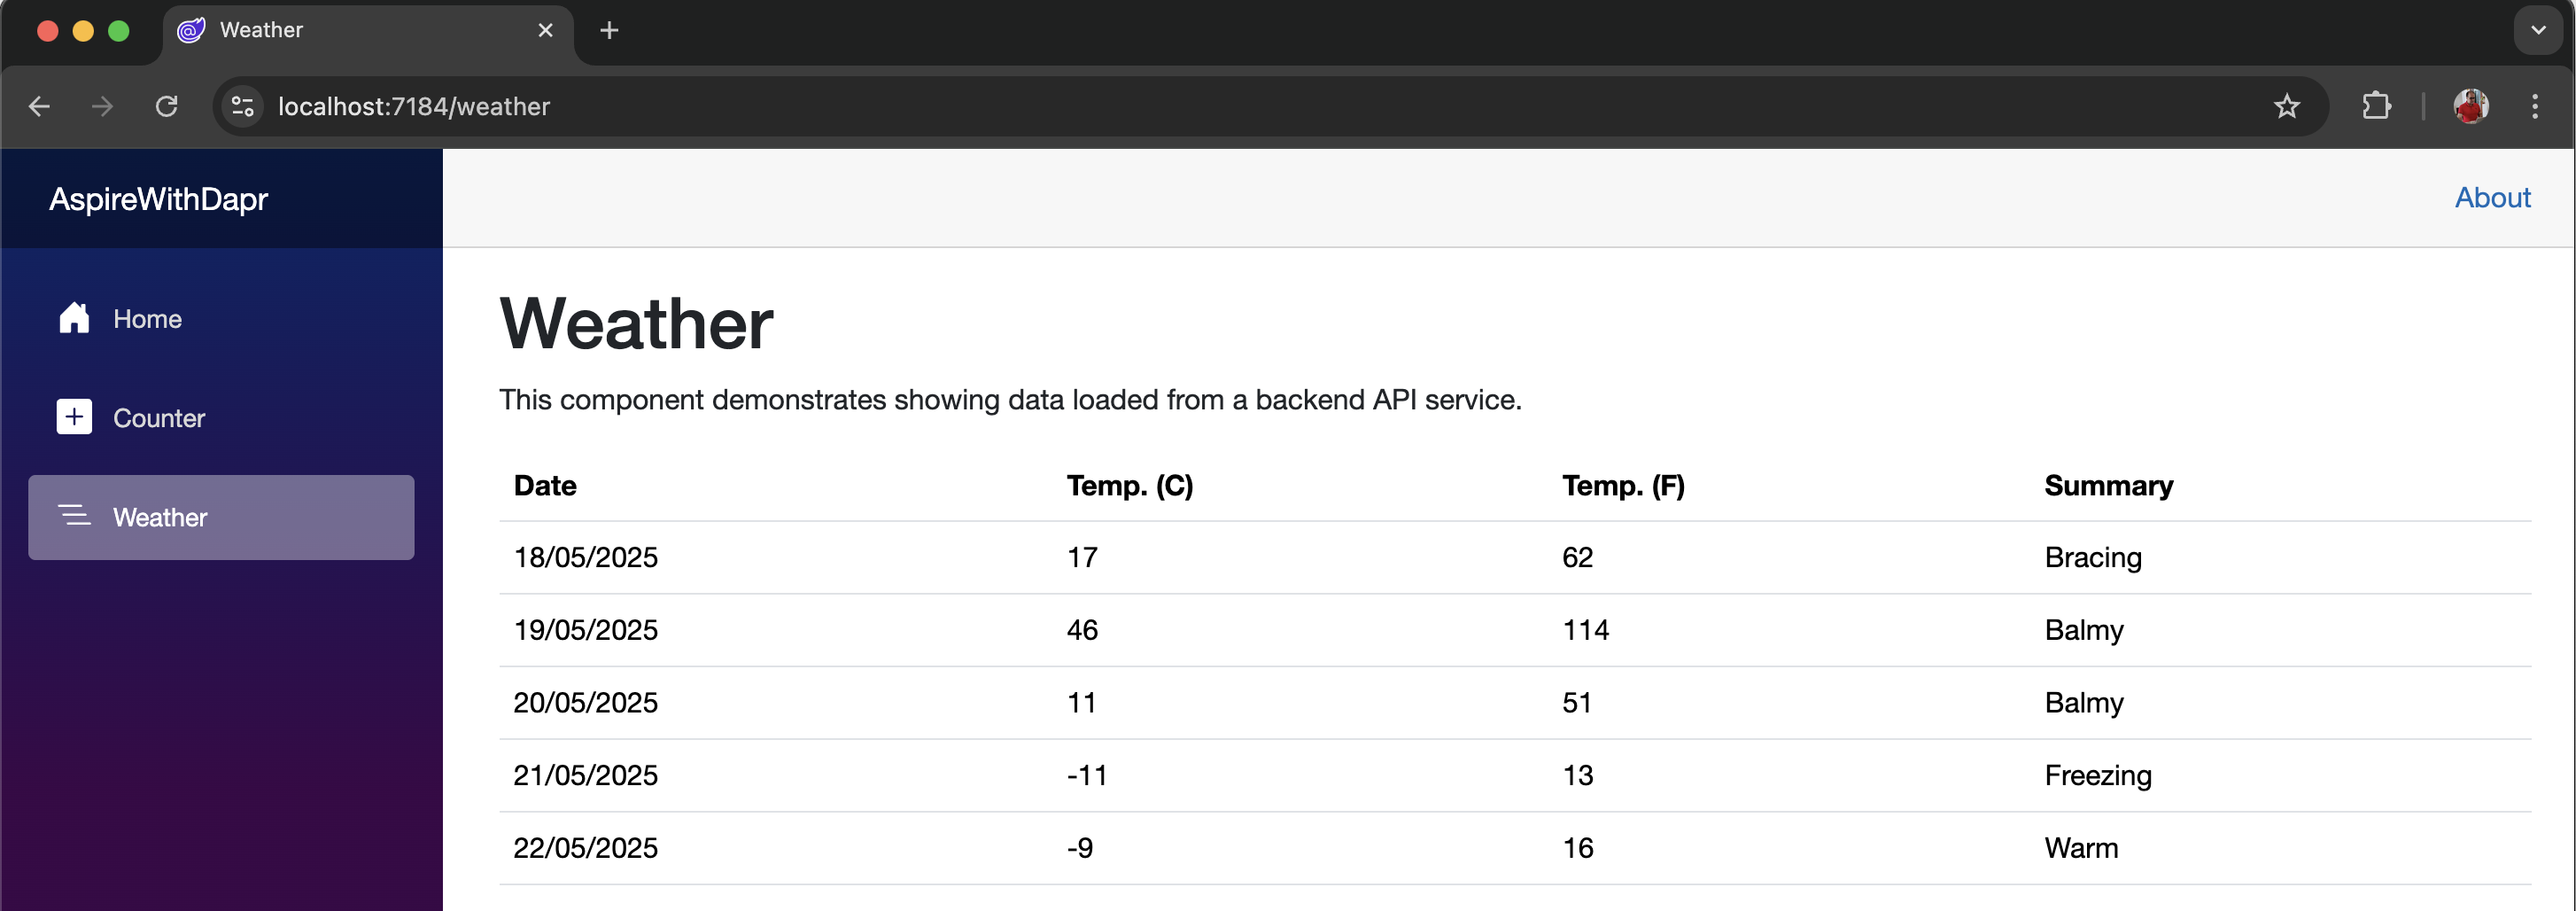
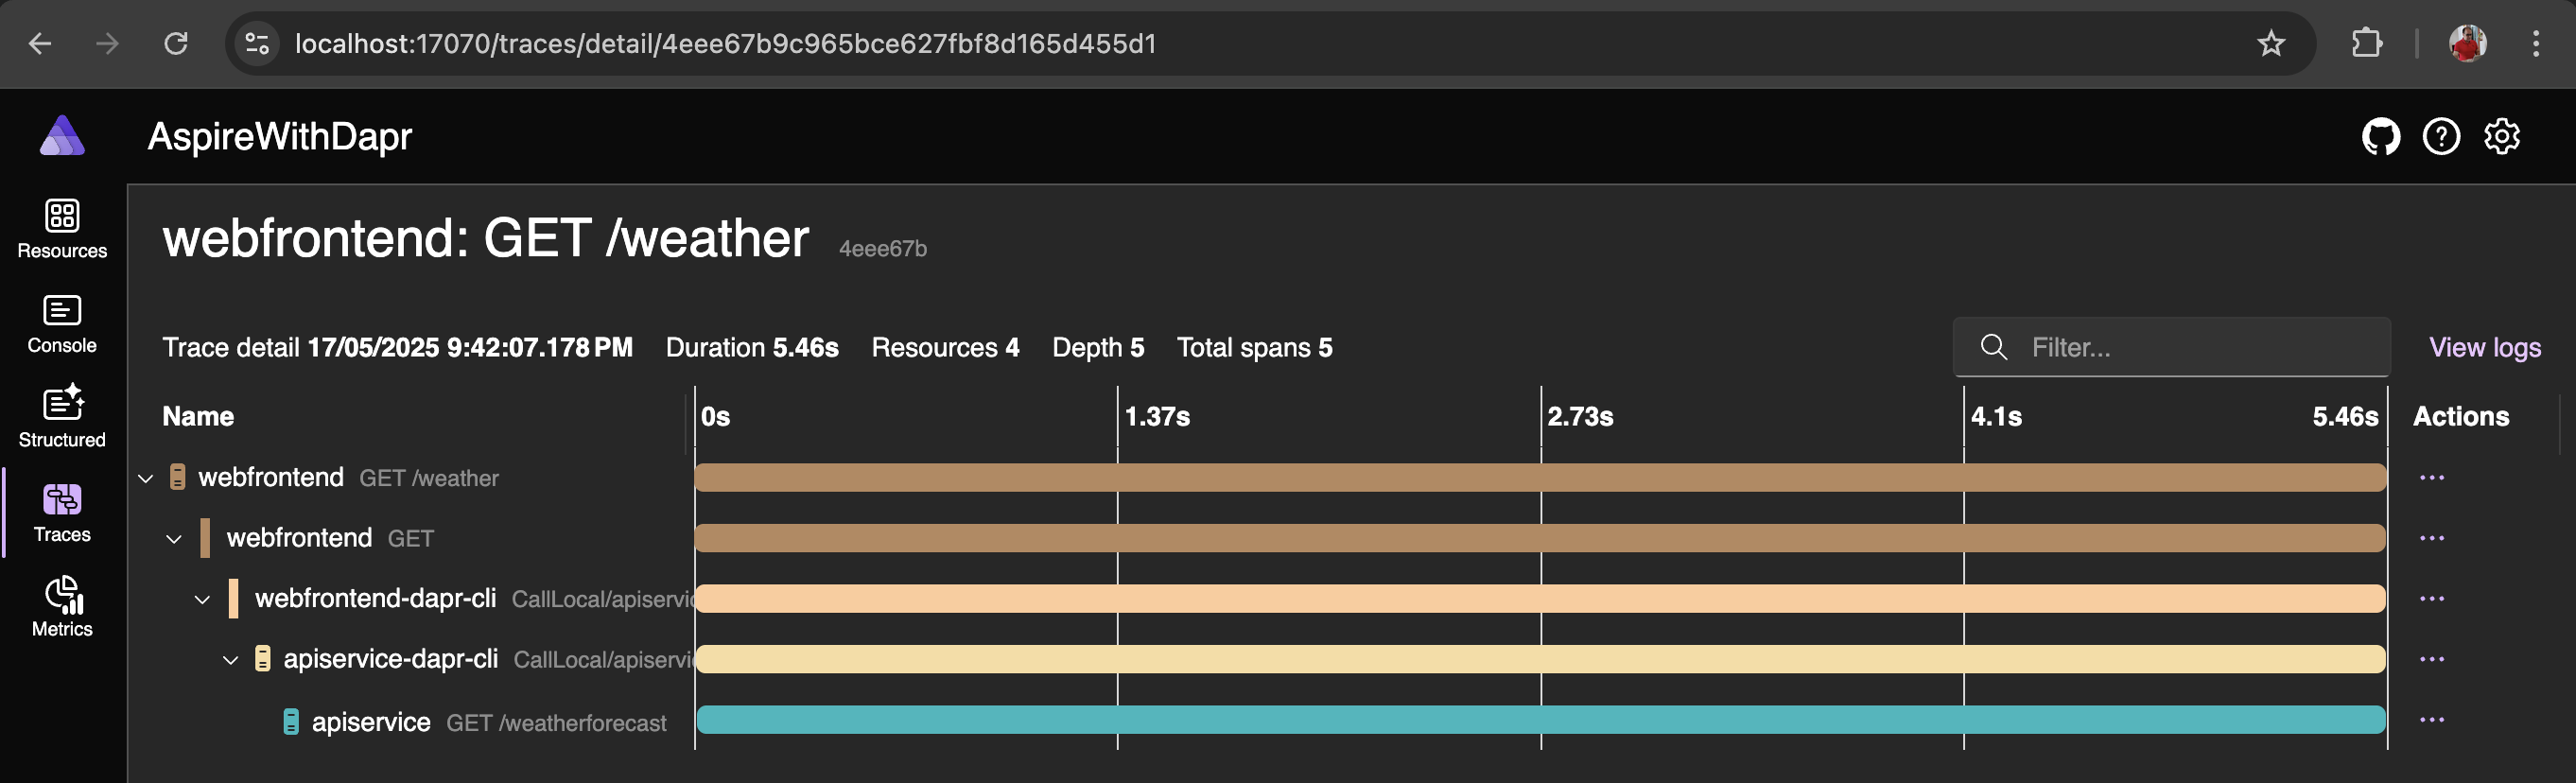
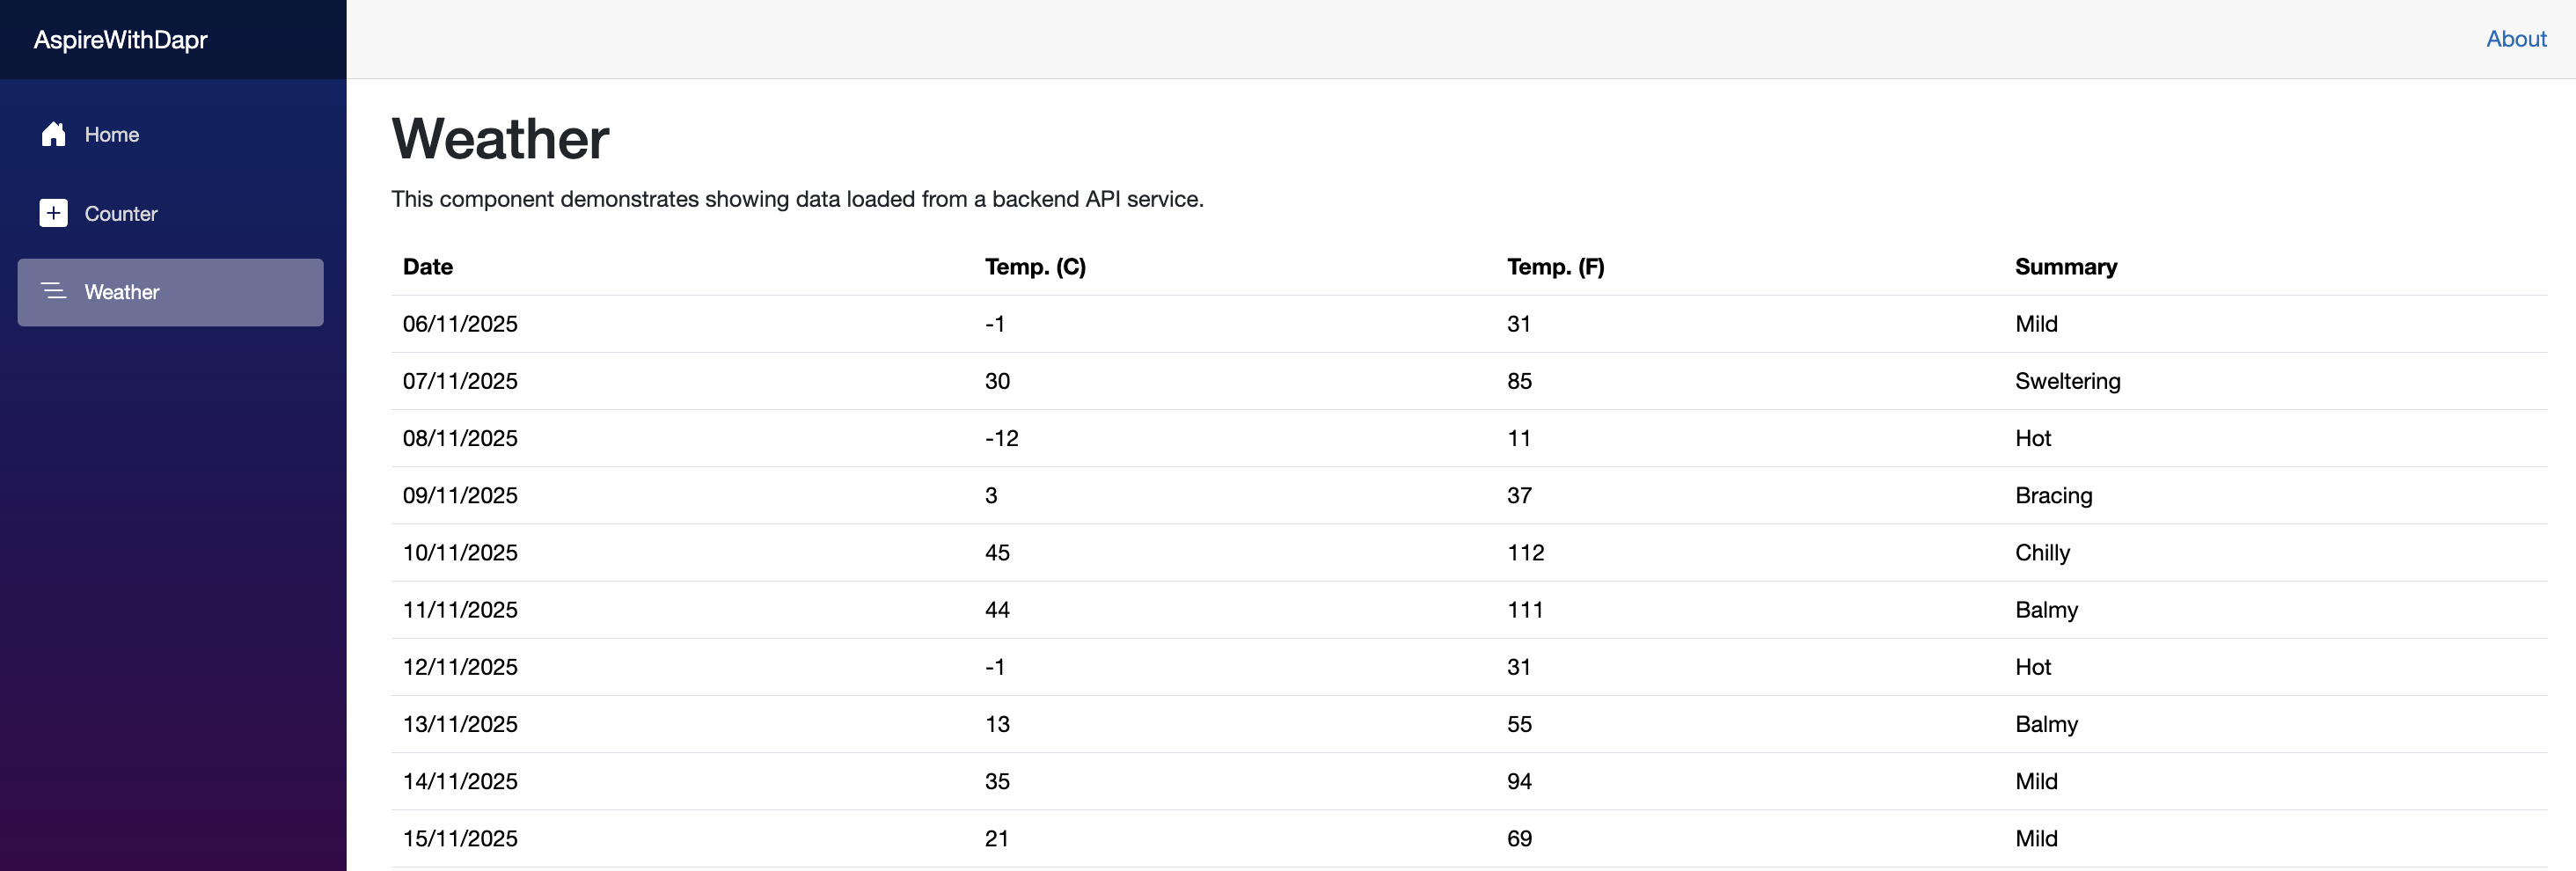
From the dashboard, you can launch the webfrontend application and initiate a request to the backend API by selecting the Weather menu. This allows you to observe the complete request flow.
Adding Statestore (external)
IMPORTANT .NET Aspire and Dapr complement each other in developing and deploying distributed applications. Both excel in their respective domains but present a few challenges when used together. You may also notice a lack of documentation and sample projects. The official resources from Microsoft and Dapr do not provide all the necessary details.
Based on my observation, when .NET Aspire manages resources, it assigns different ports with each run. However, Dapr sidecars require fixed ports to function correctly. This means that to make them work together, you need to manage the resources externally. If you're not integrating Dapr with .NET Aspire, both Aspire and Dapr run smoothly on their own.
Now, let's run the following command to start MySQL and PostgreSQL as containers.
# To run the MySQL container
docker run -d --name aspire-mysql -e MYSQL_ROOT_PASSWORD=mysql -e MYSQL_DATABASE=dapr_db -p 3306:3306 -v aspire-mysql-data:/var/lib/mysql --health-cmd='mysqladmin ping --silent' --health-interval=10s --restart unless-stopped mysql:latest

# To run the PostgreSQL container
docker run -d --name aspire-postgres -e POSTGRES_USER=postgres -e POSTGRES_PASSWORD=postgres -e POSTGRES_DB=dapr_db -p 5432:5432 -v aspire-postgres-data:/var/lib/postgresql --health-cmd='pg_isready -U postgres' --health-interval=10s --health-retries=5 --restart unless-stopped postgres:latest
# To remove the MySQL container including volume
docker rm -f aspire-mysql >/dev/null 2>&1 || true; docker volume rm -f aspire-mysql-data >/dev/null 2>&1 || true

# To remove the PostgreSQL container including volume
docker rm -f aspire-postgres >/dev/null 2>&1 || true; docker volume rm -f aspire-postgres-data >/dev/null 2>&1 || true
After successful execution, you can verify that both containers are running using Docker Desktop or the Docker CLI.
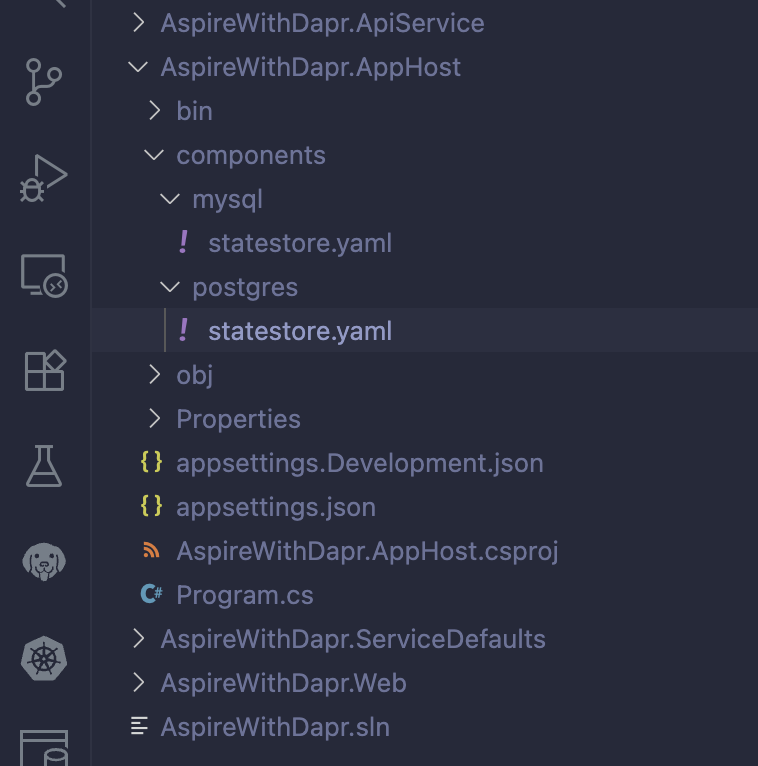
Create Statestore component
Follow the folder structure shown below and create two statestore.yaml files—one for MySQL and another for PostgreSQL. For simplicity, include the complete connection details directly in these files. In a production setup, you would typically store these details securely using secrets management.
apiVersion: dapr.io/v1alpha1
kind: Component
metadata:
  name: statestore
spec:
  type: state.mysql
  version: v1
  metadata:
  - name: connectionString
    value: "root:mysql@tcp(localhost:3306)/?allowNativePasswords=true&parseTime=true"
  - name: schemaName
    value: "dapr_db"
  - name: tableName
    value: "state"
  - name: metadataTableName
    value: "dapr_metadata"
  - name: timeoutInSeconds
value: "20"apiVersion: dapr.io/v1alpha1
kind: Component
metadata:
name: statestore
spec:
type: state.postgresql
version: v1
metadata:
- name: connectionString
value: "host=localhost user=postgres password=postgres port=5432 connect_timeout=10 database=dapr_db"
- name: tableName
value: "state"
- name: metadataTableName
value: "dapr_metadata"
- name: timeoutInSeconds
value: "20"
- name: cleanupIntervalInSeconds
value: "3600"Code Change in AppHost
Update the Program.cs file in the AppHost project as shown in the code snippet below. This configuration defines the state store based on the selected provider (MySQL or PostgreSQL).
Additionally, it pulls the Adminer image and runs it as a container as part of the Aspire resources. You can later connect to the databases (MySQL or PostgreSQL) through Adminer to analyze the stored data.
using CommunityToolkit.Aspire.Hosting.Dapr;

var builder = DistributedApplication.CreateBuilder(args);

// The YAML file points to an external state store instance
var stateStore = builder.AddDaprStateStore("statestore", new DaprComponentOptions
{
    // Path to your Dapr component YAML file - MySQL state store
     LocalPath = "../AspireWithDapr.AppHost/components/mysql/statestore.yaml"
    // Path to your Dapr component YAML file - PostgreSQL state store
    // Uncomment the line below to use PostgreSQL
    // LocalPath = "../AspireWithDapr.AppHost/components/postgres/statestore.yaml"

});

// Optional data-visualization GUIs for local development.
// Adminer (MySQL & PostgreSQL) - lightweight DB browser.
var adminer = builder.AddContainer("adminer", "adminer", "latest")
    .WithEndpoint(port: 8081, targetPort: 8080, name: "adminer", scheme: "http");

var apiService = builder.AddProject<Projects.AspireWithDapr_ApiService>("apiservice")
    .WithHttpHealthCheck("/health")
    .WithReference(stateStore)
    .WithDaprSidecar();

builder.AddProject<Projects.AspireWithDapr_Web>("webfrontend")
    .WithExternalHttpEndpoints()
    .WithHttpHealthCheck("/health")
    .WaitFor(apiService)
    .WithReference(apiService)
    .WithDaprSidecar();

builder.Build().Run();
After making the above changes, run the application and verify that the Dapr sidecar loads the configured state store without any issues. You can review the Dapr sidecar logs and look for the entries listed below, depending on the selected state store.
# For MySQL
msg="Component loaded: statestore (state.mysql/v1)" app_id=apiservice
# For PostgreSQL
msg="Component loaded: statestore (state.postgresql/v1)" app_id=apiserviceNow that the state stores are defined and loaded properly, let's use them in the apiService.
Code Change in ApiService
The WeatherForecast endpoint has been modified to retrieve data from the state store, and a hosted service has been introduced to seed initial data during startup if none exists. Since the external stores use persistent volumes, data is retained across restarts. Deleting the volume allows you to observe how the application handles missing data. For further details, review the ApiService logs in the Aspire Dashboard.
NOTE: What's interesting here is that the ApiService doesn't know anything about MySQL or PostgreSQL—and it doesn't need to. There are no SDK references or connection details in the code. That's exactly where Dapr shines by handling the heavy lifting behind the scenes.
using Dapr.Client;
using AspireWithDapr.ApiService;

var builder = WebApplication.CreateBuilder(args);

// Add service defaults & Aspire client integrations.
builder.AddServiceDefaults();

// Add Dapr client
builder.Services.AddDaprClient();

// Add weather data seeder as a hosted service
builder.Services.AddHostedService<WeatherDataSeeder>();

// Add services to the container.
builder.Services.AddProblemDetails();

// Learn more about configuring OpenAPI at https://aka.ms/aspnet/openapi
builder.Services.AddOpenApi();

var app = builder.Build();

// Configure the HTTP request pipeline.
app.UseExceptionHandler();

if (app.Environment.IsDevelopment())
{
    app.MapOpenApi();
}

const string StateStoreName = "statestore";

app.MapGet("/weatherforecast", async (DaprClient daprClient) =>
{
    var forecasts = new List<WeatherForecast>();

    // Read all 10 weather forecasts from Dapr state store
    for (int i = 1; i <= 10; i++)
    {
        var key = $"weather-{i}";
        var forecast = await daprClient.GetStateAsync<WeatherForecast>(StateStoreName, key);

        if (forecast != null)
        {
            forecasts.Add(forecast);
        }
    }

    return forecasts.ToArray();
})
.WithName("GetWeatherForecast");

app.MapDefaultEndpoints();

app.Run();

record WeatherForecast(DateOnly Date, int TemperatureC, string? Summary)
{
    public int TemperatureF => 32 + (int)(TemperatureC / 0.5556);
}
using Dapr.Client;

namespace AspireWithDapr.ApiService;

public class WeatherDataSeeder : IHostedService
{
    private readonly DaprClient _daprClient;
    private readonly ILogger<WeatherDataSeeder> _logger;
    private const string StateStoreName = "statestore";
    private const string SeedFlagKey = "weather-data-seeded";

    private static readonly string[] Summaries =
    [
        "Freezing", "Bracing", "Chilly", "Cool", "Mild",
        "Warm", "Balmy", "Hot", "Sweltering", "Scorching"
    ];

    public WeatherDataSeeder(DaprClient daprClient, ILogger<WeatherDataSeeder> logger)
    {
        _daprClient = daprClient;
        _logger = logger;
    }

    public async Task StartAsync(CancellationToken cancellationToken)
    {
        try
        {
            _logger.LogInformation("Checking if weather data needs to be seeded...");

            // Check if data has already been seeded
            var seedFlag = await _daprClient.GetStateAsync<bool>(
                StateStoreName,
                SeedFlagKey,
                cancellationToken: cancellationToken);

            if (seedFlag)
            {
                _logger.LogInformation("Weather data already seeded. Skipping seed operation.");
                return;
            }

            _logger.LogInformation("Seeding weather forecast data...");

            // Seed 10 weather forecasts
            var random = new Random();
            for (int i = 1; i <= 10; i++)
            {
                var weatherForecast = new WeatherForecast(
                    DateOnly.FromDateTime(DateTime.Now.AddDays(i)),
                    random.Next(-20, 55),
                    Summaries[random.Next(Summaries.Length)]
                );

                var key = $"weather-{i}";
                await _daprClient.SaveStateAsync(
                    StateStoreName,
                    key,
                    weatherForecast,
                    cancellationToken: cancellationToken);

                _logger.LogInformation(
                    "Seeded weather forecast {Index}: Date={Date}, Temp={Temp}°C, Summary={Summary}",
                    i, weatherForecast.Date, weatherForecast.TemperatureC, weatherForecast.Summary);
            }

            // Set the seed flag to prevent re-seeding
            await _daprClient.SaveStateAsync(
                StateStoreName,
                SeedFlagKey,
                true,
                cancellationToken: cancellationToken);

            _logger.LogInformation("Weather data seeding completed successfully.");
        }
        catch (Exception ex)
        {
            _logger.LogError(ex, "Error occurred while seeding weather data.");
            throw;
        }
    }

    public Task StopAsync(CancellationToken cancellationToken)
    {
        return Task.CompletedTask;
    }
}
Now that everything is wired up, it's time to run the application and see it in action. Use the following commands to start the application:
dotnet run --project AspireWithDapr.AppHost/AspireWithDapr.AppHost.csproj or
aspire runGo ahead and open the Aspire Dashboard to check that all resources are up and running.
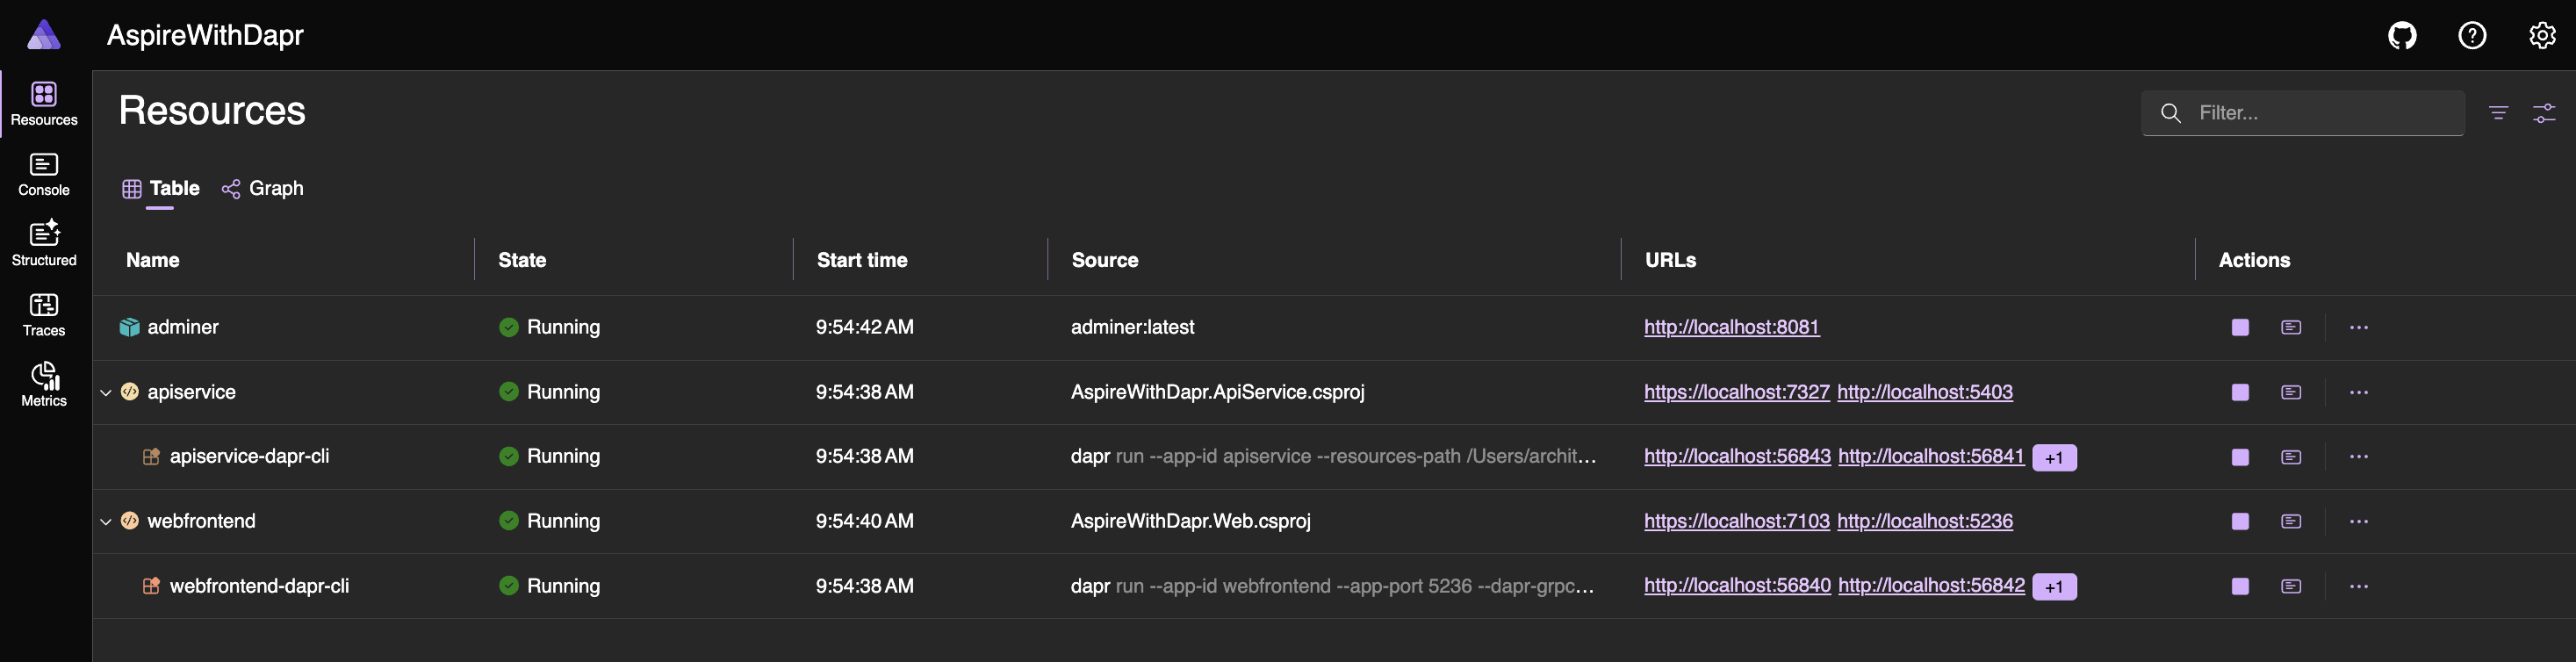
From there, open the webfrontend app and click the Weather menu to see the data coming from your configured state store.
Use of Adminer
Now that the application is running smoothly, it's time to connect to your database (MySQL or PostgreSQL) using Adminer and take a look at the stored data.
You can open the Adminer web app directly from the Aspire Dashboard. It should look similar to the snapshot shown below.

From the dropdown, select MySQL/MariaDB or PostgreSQL, depending on the configured state store. Then, enter the required connection details, including Server, Username, Password, and Database.
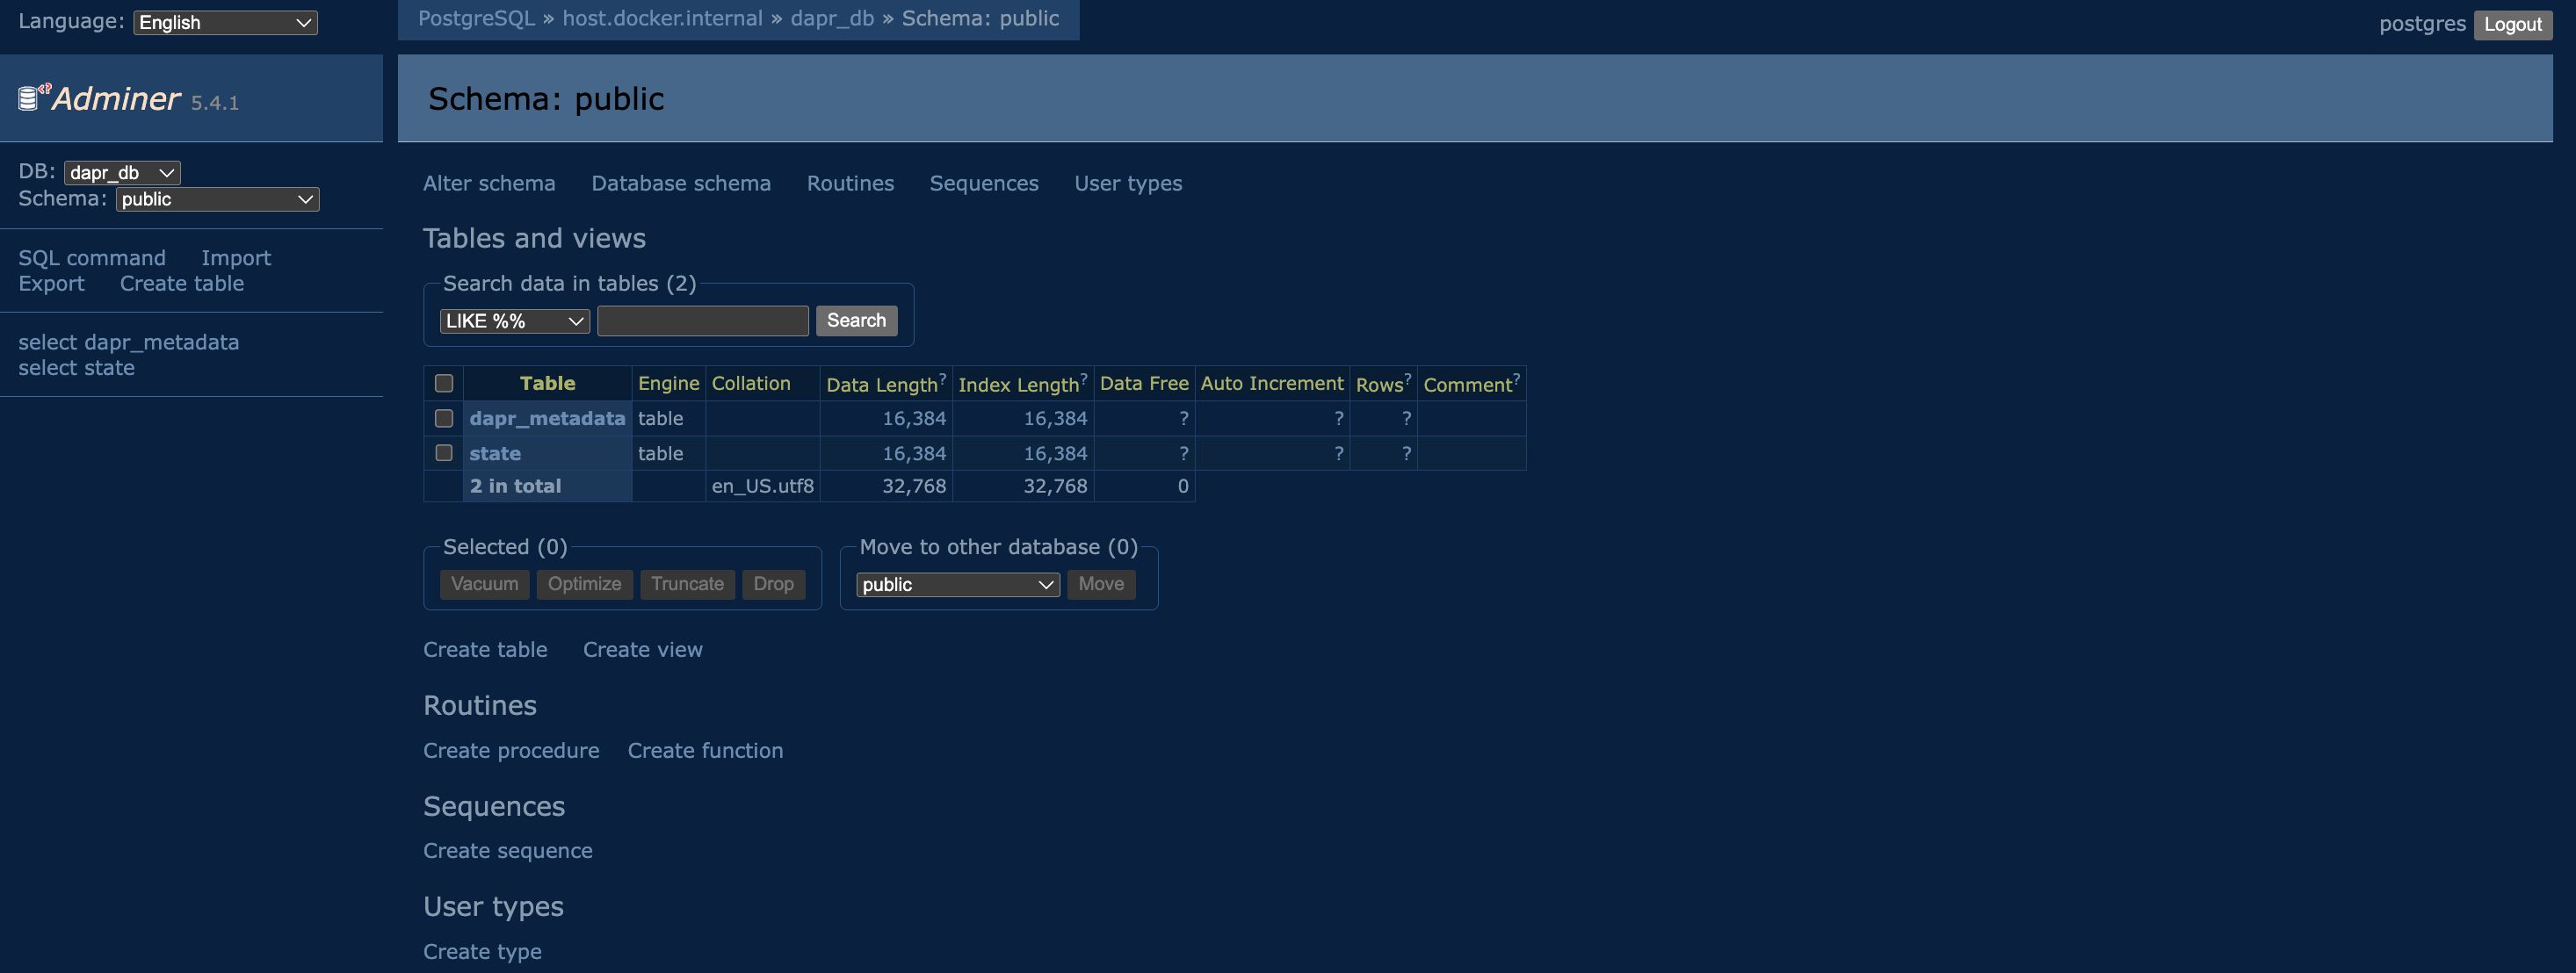
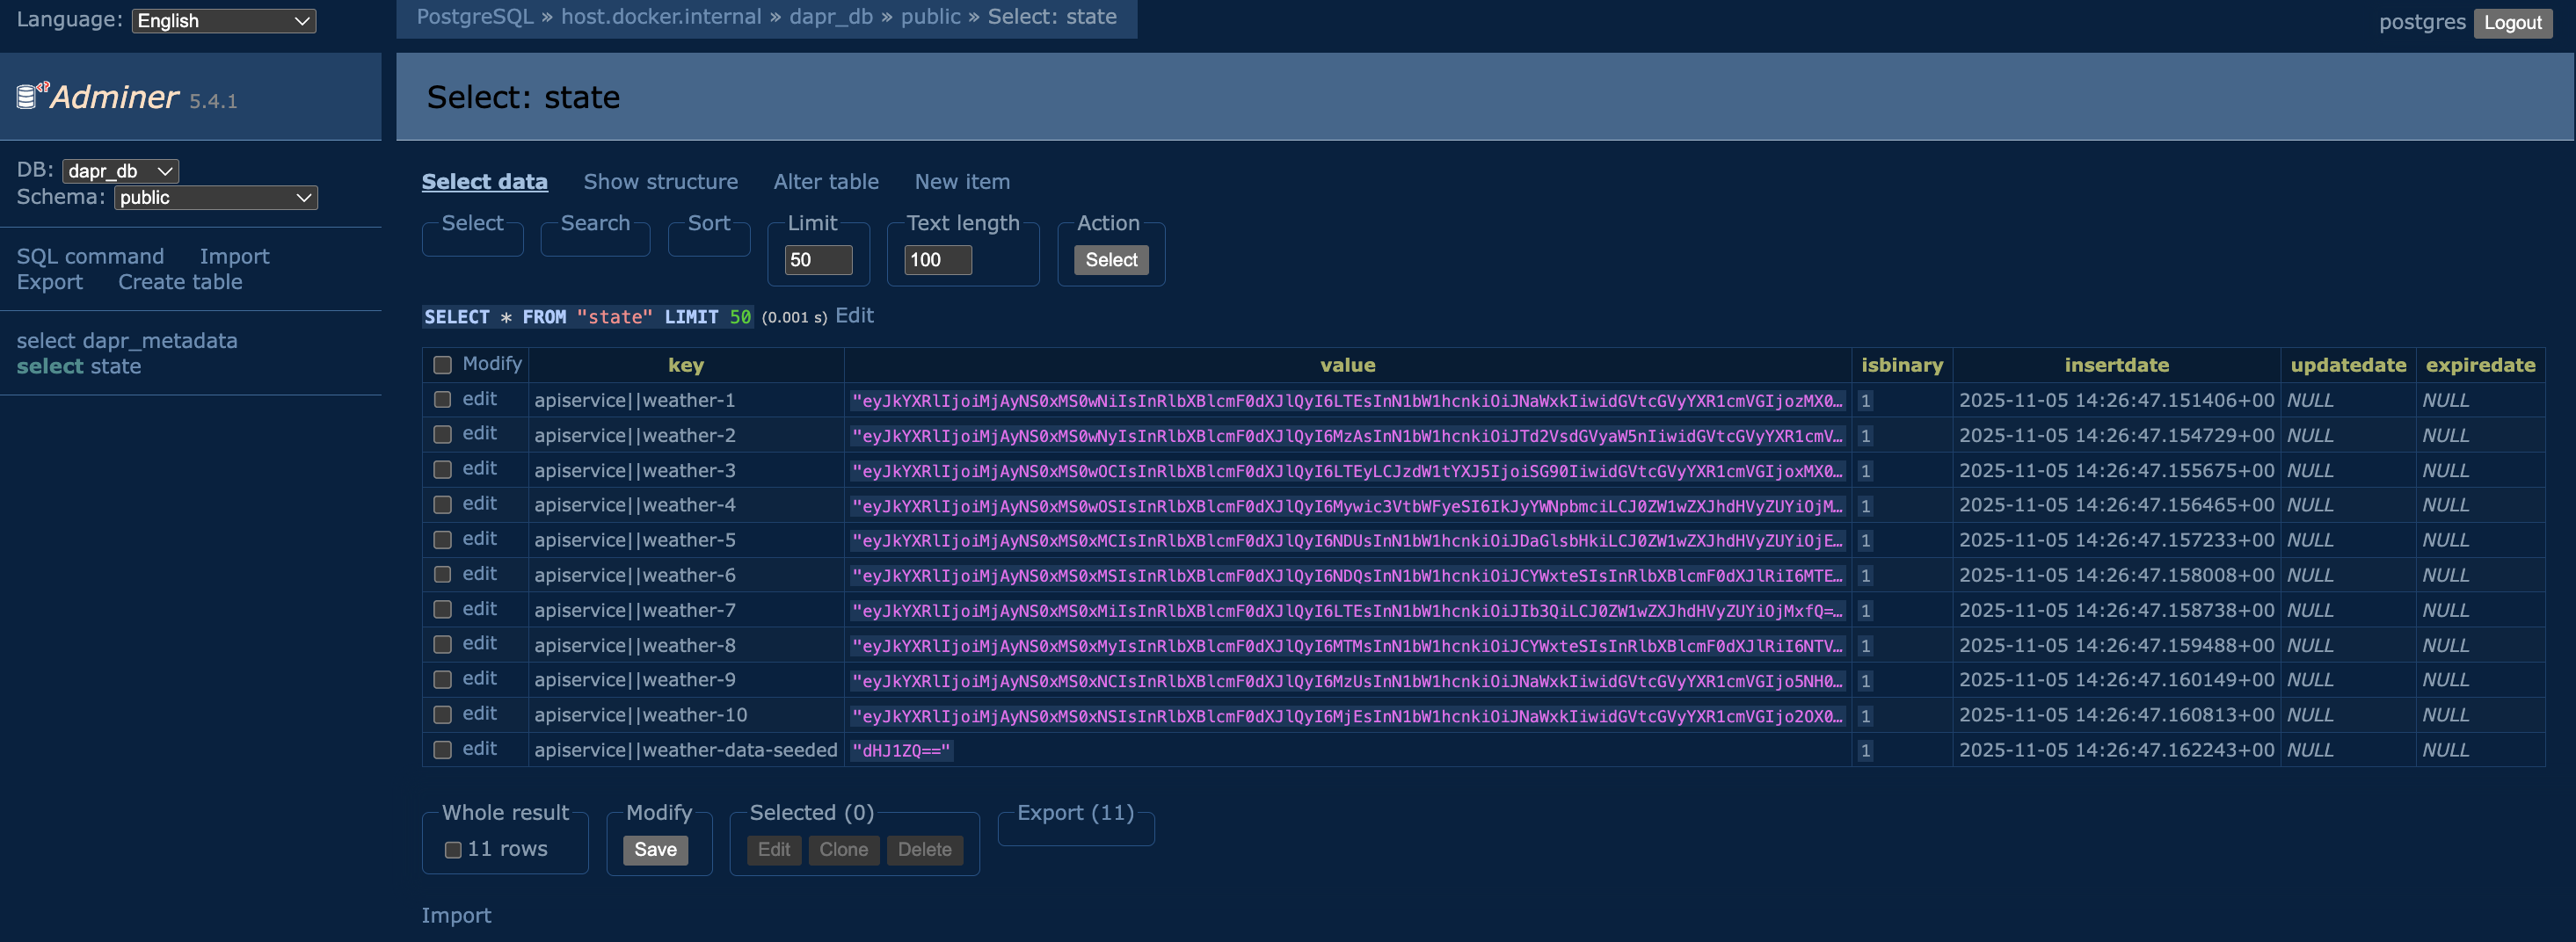
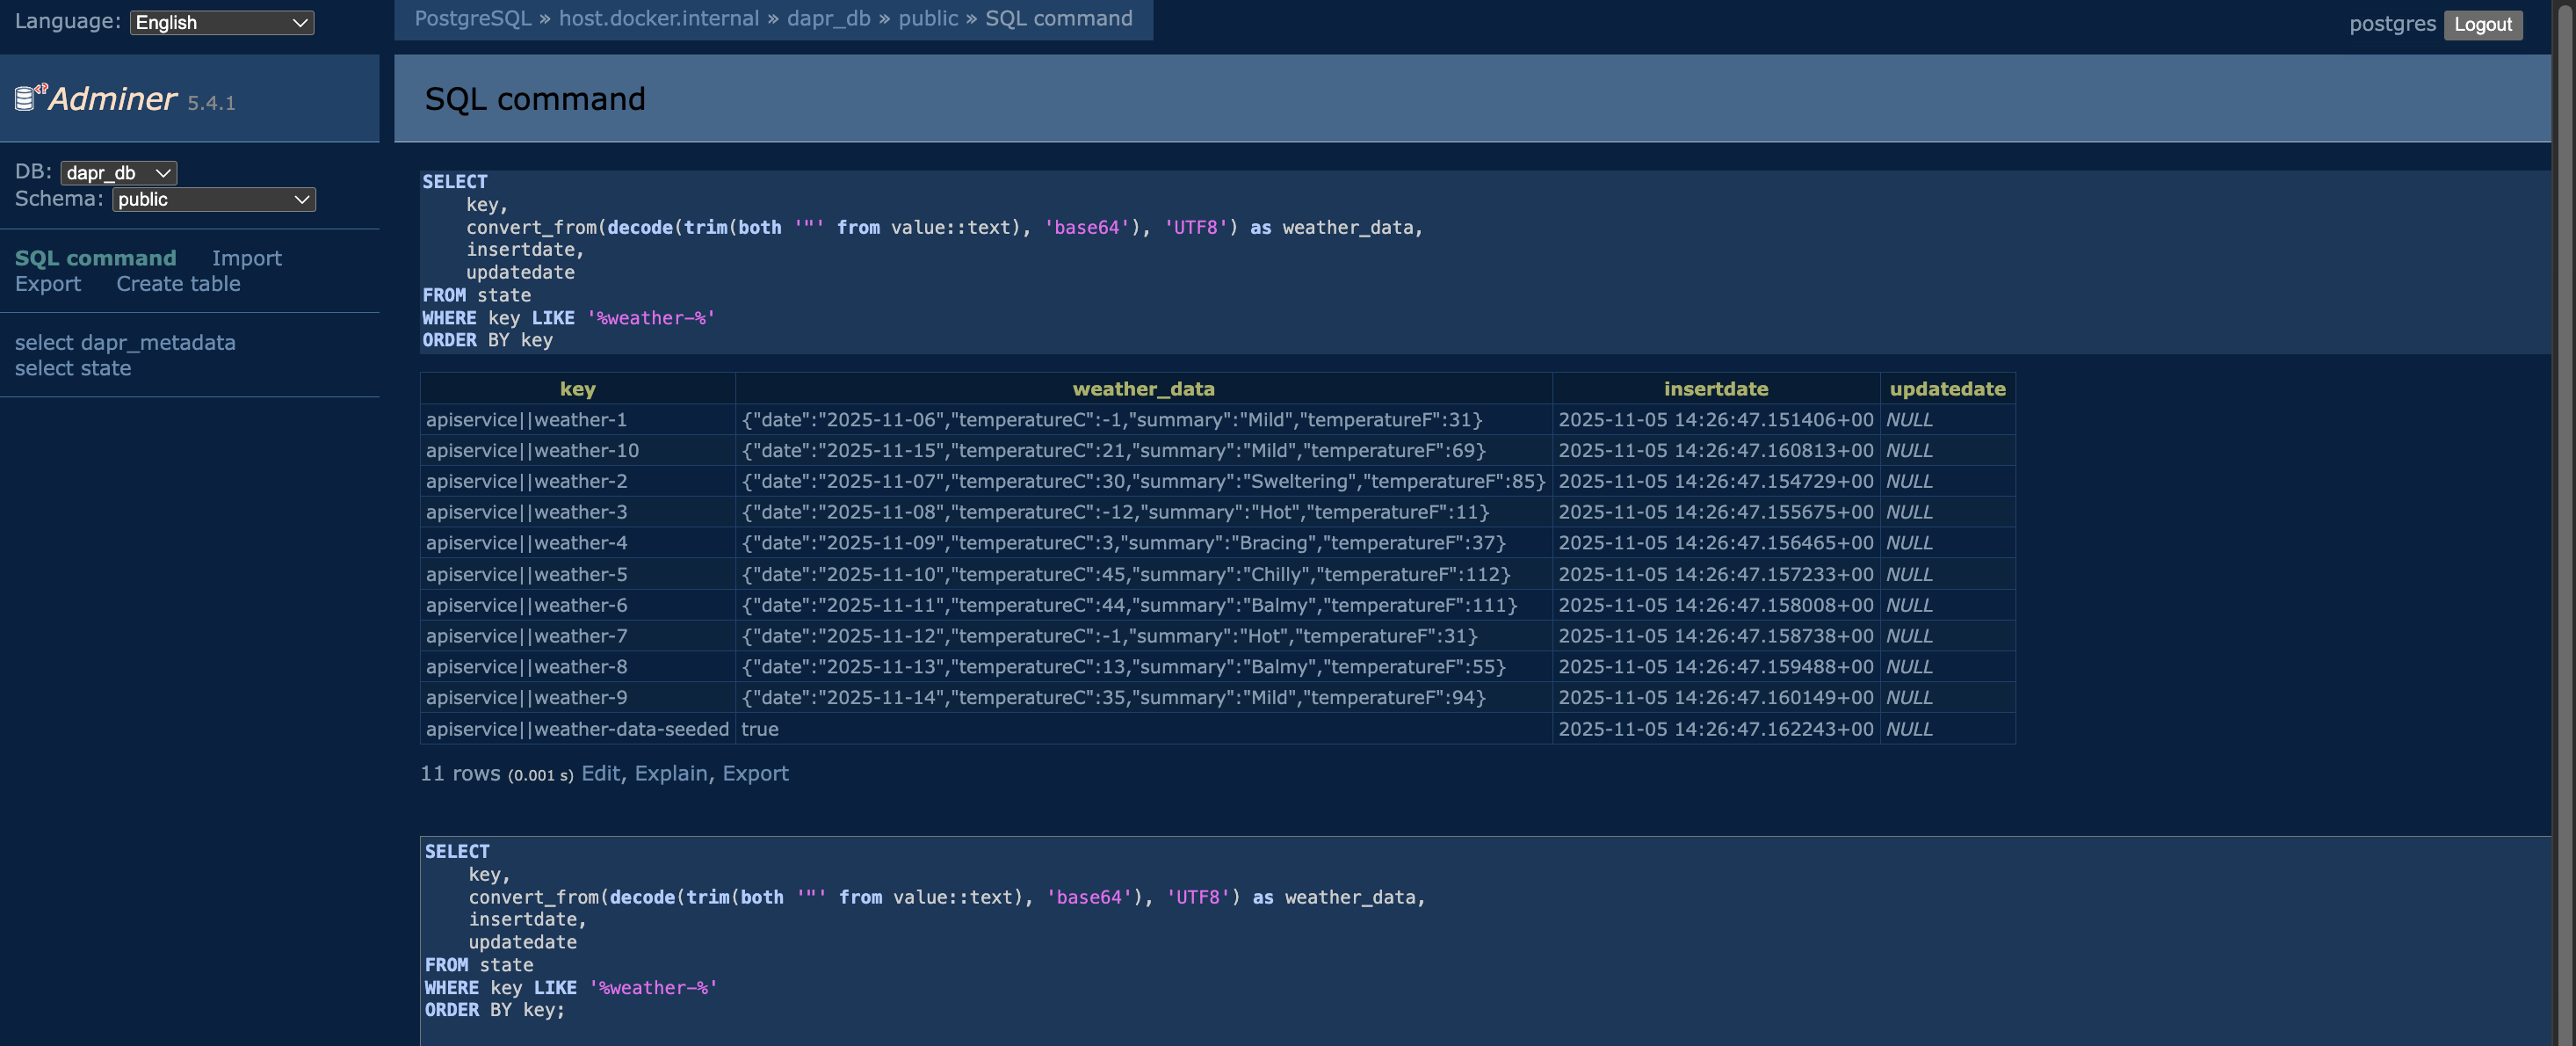
Upon successful login, the interface should appear as shown in the snapshot below. You can now explore various features of Adminer to understand how it works and experiment with the stored data.
Conclusion
Together, these technologies complement each other beautifully. Dapr handles runtime concerns like service communication and state management, while .NET Aspire streamlines the development and deployment workflow. While integrating them does require careful consideration of port management and resource orchestration (as highlighted in this post), the resulting developer experience and application portability make it a compelling combination for building modern distributed applications.